
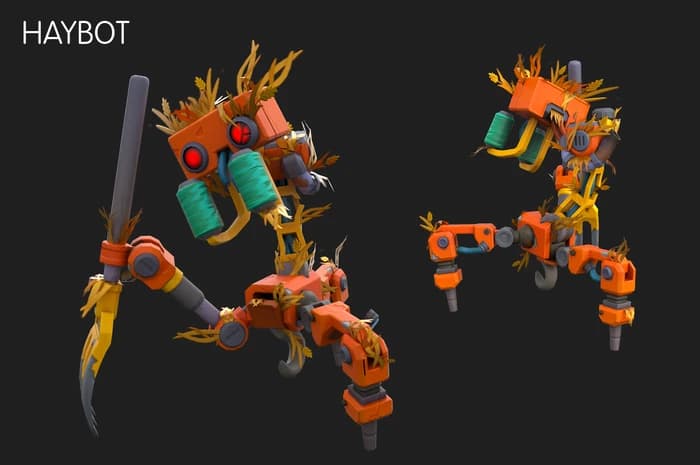
- Health (Normal)
- 100
- Poke damage
- 20
- Swing damage
- 30
- Guaranteed drop
- Scrap Metal
- Bonus Circuit Board
- 33.3%
- Bonus Component Kit
- 16.7%
- Bonus empty roll
- 50%
- Role
- Common surface melee threat and Scrap Metal farm
Routes and locations
Haybots roam fields and ruins and also attack active farms during raids.
Fields and ruins
Expect patrols around agricultural terrain and broken structures.
Farm raids
Active crops can attract Haybots as the raid level increases.
- Defeated Haybots leave Scrap Metal and can drop Circuit Boards or Component Kits.
- Use distance and attack timing when fighting with the Sledgehammer.
- Water briefly stuns them.
Haybot recipes and properties
- Difficulty baseline
- Normal
- Attack profile
- Delayed poke and wide swing
- Structure threat
- Breaks low-durability blocks on hit chance
- Best early answer
- Spudgun kite or hammer with space
Haybot loot (Normal difficulty)
| Drop | Chance / note |
|---|---|
| Scrap Metal | Always |
| Circuit Board | 33.3% on bonus table |
| Component Kit | 16.7% on bonus table |
| None (bonus roll) | 50% on bonus table |
Scrap Metal is guaranteed. The bonus roll is independent and may return nothing half the time.
Haybot block destruction chance by durability level
| Durability level | Break chance |
|---|---|
| 1 | 100% |
| 2 | 60% |
| 3 | 35% |
| 4 | 25% |
| 5 | 12.5% |
| 6 | 2% |
| 7 | 1% |
| 8+ | 0% (Haybot cannot break) |
Durability describes break probability per hit, not a separate hit-point bar.
Hostile bot combat baseline (Normal difficulty)
| Bot | Health | Key attack damage | Guaranteed or high-value drop |
|---|---|---|---|
| Totebot | 40 | 15 melee | Circuit Board (always) |
| Haybot | 100 | Poke 20 / Swing 30 | Scrap Metal (always) |
| Tapebot (Blue) | 40 | 55 projectile | Battery ~35.7% / Component Kit ~14.3% |
| Tapebot (Red) | 40 | 62 projectile | Battery ~35.7% / Component Kit ~14.3% |
| Farmbot | 1500 | Kick 10 / Swipe 35 / Pesticide DoT | Warehouse Key (always) |
Classic attack values are paired with the current 1.0 unit health values. New bot families have individual pages because their movement, immunity, and loot rules do not fit one flat table.
Read the Pitchfork Wind-Up
Haybots telegraph before the poke lands. Backpedal through the wind-up instead of trading a full swing in place, then re-engage once the arm resets. Crowded ruins punish players who stand still to finish a last hammer hit.
- Pull one Haybot out of a ruin doorway before fighting the group.
- Use a short water interruption when two wind-ups overlap.
- Park fragile vehicles outside the pitchfork arc.
Scrap Metal First, Bonus Drops Second
Every Haybot pays Scrap Metal. Circuit Boards and Component Kits are bonus-table outcomes—expect empty rolls half the time and plan Circuit Board farming around Totebots when you need guaranteed boards.
Durability Beats Wishful Wood Walls
Haybot melee uses a break-chance table, not a simple HP bar on blocks. Soft scrap-wood shells fail often; higher durability tiers drop the break chance sharply, and durability 8+ is immune to Haybot destruction.
- Upgrade farm-facing walls before expanding crop value.
- Leave a kite lane in front of the wall so you are not pinned against it.
- Repair after raids instead of assuming unbroken panels mean the design worked.
When Haybots Share the Field With Worse Targets
On raid nights and ruin clears, Haybots are the volume problem, not always the priority kill. Clear explosive Totebots and Tapebots first when those silhouettes appear, then finish Haybots once the lane is controllable.
Ammo Math Versus Hammer Risk
A Spudgun at 28 damage needs about four hits for a 100 HP Haybot. That is cheap compared with Farmbot fights, so spend potatoes freely when a pitchfork group threatens a crop row or a loaded hauler.