
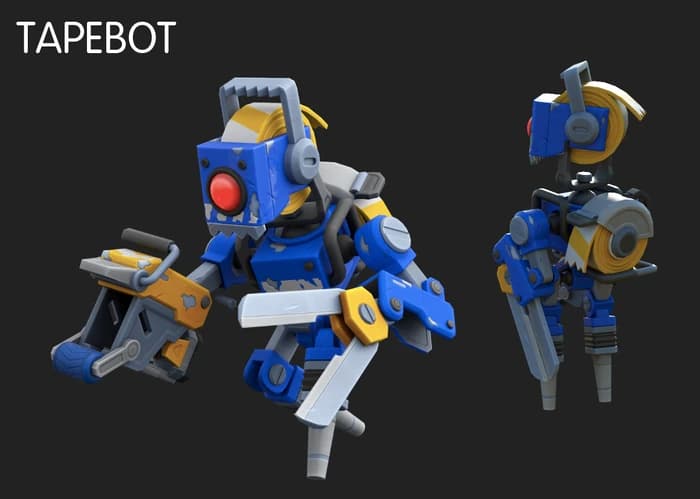
- Health (Normal)
- 40
- Blue projectile damage
- 55
- Red projectile damage
- 62
- Battery drop
- ≈35.7%
- Component Kit drop
- ≈14.3%
- Empty roll
- ≈50%
- Combat families
- Blue, Red, Green, and Yellow
- Primary stages
- Warehouses, Growlabs, and high-pressure raids
Routes and locations
Tapebots are ranged Warehouse enemies concentrated inside industrial dungeon floors.
Warehouses
Expect them in corridors, offices, and open interior spaces after using a Warehouse Key.
Warehouse approach
Prepare ammunition, healing food, and cover before entering.
- Their tape projectiles are extremely dangerous.
- Use cover and avoid crossing large open rooms carelessly.
- Clear the return path before carrying rare crops or loot.
Tapebot recipes and properties
- Threat type
- Accurate ranged pressure
- Cover requirement
- Hard corners and one-angle peeks
- Green variant
- Weaponized bubble-plastic projectile
- Yellow variant
- Four-color ink that hurts and slows
- Counter
- Spudgun from cover; avoid open room centers
Tapebot loot (Normal difficulty)
| Drop | Chance / note |
|---|---|
| Battery | ≈35.7% |
| Component Kit | ≈14.3% |
| None | ≈50% |
Blue Tapebots deal 55 damage; Red Tapebots deal 62. Drop rates are shared on the documented loot table.
Peek One Angle, Not the Whole Room
Tapebots punish full doorway exposures. Slice the room: clear the visible shooter, return to hard cover, then open the next angle. Crossing the center for a Battery on the floor is how Warehouse runs end early.
- Bring a real potato reserve—misses cost more than Totebot fights.
- Check elevated and side balconies before looting desks.
- Never use the cargo truck as disposable cover inside the building.
Blue Versus Red Projectile Weight
Both color lines sit at 40 HP, so time-to-kill is similar with a Spudgun. The difference is incoming damage: Blue at 55 and Red at 62 make mistakes lethal faster. Treat Red as the stricter cover check when both are present.
Battery Farming With Empty-Roll Patience
Roughly half of Tapebot kills return nothing on the documented table. Batteries appear about 35.7% of the time and Component Kits about 14.3%. Plan electrical crafting around multiple Warehouse clears, not a single lucky kill.
Interior Lighting and Sound Discipline
Dark Warehouse corridors hide muzzle flashes until you are already committed. Use Glowsticks or vehicle lights from behind cover, listen for the tape-fire cue, and do not sprint past uncleared corners while overloaded with loot.
- Light the next intersection from cover.
- Eliminate the Tapebot before picking up floor loot.
- Stage Batteries in a hallway chest before the next floor.
When Raids Bring Tapebots to the Farm
High plant-value farms can invite ranged bots into open fields. Soft wood fences fail as cover against 55–62 damage shots. Add metal or concrete peek panels on the raid approach and fight from those, not from crop soil.
Green and Yellow Tapebots Change the Room
Green Tapebots use weaponized bubble plastic and are most dangerous in groups that fill a corridor with overlapping fire. Yellow Tapebots use sorting ink that both damages and slows, turning an exposed retreat into a failed retreat. Growlab cover needs multiple exits so a slowing hit does not trap the player behind one corner.
- Blue: treat every exposed angle as a high-damage shot lane.
- Red: leave the impact area before the explosive projectile lands.
- Green: avoid standing where several bubble paths overlap.
- Yellow: preserve extra retreat distance before the slowing ink connects.